Monitoring your blood pressure at home is an important way to keep track of your health. High blood pressure is a major risk factor for heart disease, stroke, and other problems. Being able to check your levels regularly means you can spot any issues early and take steps to improve your health.
Using a home blood pressure monitor is straightforward, but there are some key things to know to make sure you get accurate readings. In this guide, we’ll take you through everything you need to do, from choosing the right monitor to taking your measurements correctly.
Choosing The Right Blood Pressure Monitor
The first step is picking a reliable blood pressure monitor to use at home. There are two main types:
- Upper arm monitors: These wrap around your upper arm and are generally considered more accurate. Look for one with a cuff size that will fit your arm.
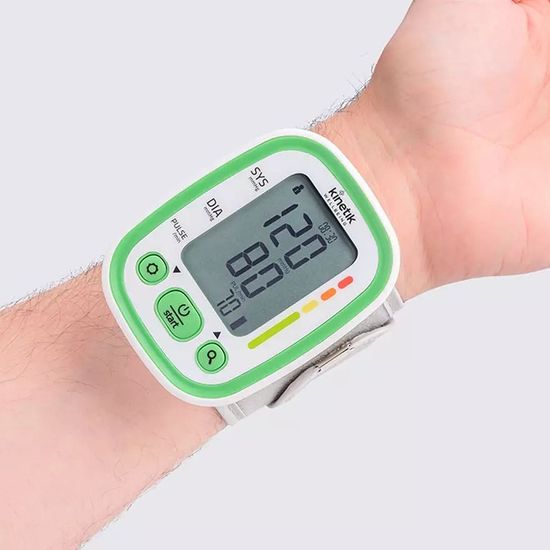
- Wrist monitors: More compact and portable, but may be less precise. Can be a good option if you have a larger arm that doesn’t fit regular cuffs.
It’s advisable to choose an automated monitor over a manual one, as automated models are easier to use solo. You want one that has been clinically validated and tested for accuracy. The British and Irish Hypertension Society provides a list of approved monitors that meet their standards.
Quality brands to look for include Omron, A&D Medical, and Kinetik Wellbeing. The Kinetik Wellbeing Advanced Blood Pressure Monitor- TMB-2080 and Kinetik Wellbeing Automatic Blood Pressure Monitor – WBP1 are upper arm monitors on the BIHS approved list. The Kinetik Wellbeing Advanced Wrist Blood Pressure Monitor WBP3 is a clinically validated wrist monitor.
Check that the cuff size will be right for the person using it by measuring your arm circumference. Also consider ease of use—look for large, easy-to-read numbers and make sure the buttons and controls are straightforward.
Preparing To Take A Reading
To get an accurate blood pressure reading, you need to create the right environment. Here are some tips:
- Sit quietly for 5 minutes before taking your blood pressure. Avoid exercise, smoking, or caffeine for at least half an hour beforehand.
- Use the bathroom so you have an empty bladder. A full bladder can temporarily raise blood pressure.
- Sit correctly with your back supported and feet flat on the floor. Have your arm supported at heart level.
- Relax and don’t talk during the reading. Take slow, steady breaths.
- Remove tight clothing from your arm as it can affect blood flow. Push up sleeves so the cuff sits directly on skin.
- Take readings at the same time each day for consistency and keep a record of the results. Aim for 2-3 readings spaced 1-2 minutes apart and record the average.
Using An Upper Arm Blood Pressure Monitor
If using an upper arm monitor:
- Sit correctly and get relaxed. Rest your arm on a flat surface like a table.
- Wrap the cuff securely around your bare upper arm, about 1 inch above the elbow crease. Make sure the tubes run down the inside of your arm and the arterial marker is centered on your arm’s inner aspect. The cuff should feel snug but not overly tight.
- Press the start button and allow your arm to rest naturally with your palm facing up.
- Remain still and quiet as the cuff inflates and then deflates. Don’t flex your arm muscles during the reading.
- The monitor will display your results, providing a systolic pressure (when the heart beats) and a diastolic pressure (between beats). It may also show your pulse.
- Remove the cuff and allow your circulation to recover for a minute before taking another reading.
- Repeat 2-3 times and record the average systolic and diastolic numbers.
Using A Wrist Blood Pressure Monitor
For a wrist monitor:
- Sit correctly with your arm resting on a flat surface, palm facing up.
- Secure the cuff comfortably around your wrist, just above the wrist bone. Position it directly on your skin.
- Keep your arm and hand still with the cuff at heart level as it inflates and deflates. Don’t bend your wrist.
- Read your results when displayed. The systolic and diastolic pressures may be shown separately or combined.
- Remove the cuff and allow circulation to recover before the next reading.
- Take 2-3 readings 1-2 minutes apart and record the averages.
Interpreting Your Blood Pressure Readings
Once you’ve taken your measurements, what do the numbers mean? Here’s a quick guide:
- The systolic reading (the first, higher number) represents the pressure when your heart beats.
- The diastolic reading (second, lower number) is the pressure between beats when your heart relaxes.
- Normal blood pressure is considered less than 120 systolic and less than 80 diastolic.
- Elevated blood pressure is 120-129 systolic and under 80 diastolic.
- Stage 1 hypertension is 130-139 systolic or 80-89 diastolic.
- Stage 2 hypertension is over 140 systolic or over 90 diastolic.
- The pulse number indicates your heart rate in beats per minute. For adults, a normal resting heart rate is between 60 and 100 bpm.
Keep a record of your results and discuss them with your doctor. If you see high readings, take steps like diet and lifestyle changes, stress management, and medications if prescribed.
Tips For Accurate Home Monitoring
To get the most accurate readings at home:
- Use the right size cuff for your arm and position it correctly.
- Sit correctly and get settled before starting.
- Take readings at the same time each day.
- Repeat measurements 2-3 times per session and record the average.
- Compare arms to check for consistency.
- Bring your monitor to doctor visits to compare it to theirs.
- Don’t take readings when ill or in pain.
- Replace batteries regularly.
- Have your monitor inspected every 2 years for calibration.
- Consider automated Internet-connected models that provide graphed results.
Summary
With a high quality home blood pressure monitor and proper technique, you can easily keep track of your heart health. Look for a clinically validated, BIHS approved model that’s easy to use. Create a peaceful environment, sit correctly, and follow the arm or wrist instructions. Take multiple readings per session and record the averages. Discuss your results with your doctor and take steps to improve your blood pressure if needed. Consistent home monitoring means you can catch any problems early and make positive changes.
Photo by Kinetik Wellbeing
Zoom Health is a leading UK supplier of Home Health Tests and Earplugs