About This Article
Zoom Health has supplied home health tests to UK customers for nearly 20 years. This guide draws on our experience helping thousands of people use finger prickers safely and comfortably at home. Always consult a healthcare professional for medical advice.
Published: 2017 | Last Updated: February 2026 | By: Anthony Cunningham
In This Article
What Is a Finger Pricker?
A finger pricker is the term that is often used to describe the small medical device that is supplied with many home health test kits. The correct name for a finger pricker is a disposable single safety lancet. Many people call it a finger pricker as it is the device that pricks your finger to release a small amount of blood for testing.
Safety lancets are quick and easy to use and fit easily into the hand. They are designed to prevent error and work quickly. Unlike older lancing devices, modern disposable safety lancets do not require a separate lancet device — simply use and dispose of safely. The NHS recommends that lancets used for blood sampling at home should always be single-use and disposed of in an approved sharps container.
The Unistik 3 Range
At Zoom Health we supply a lot of home test kits. For this reason we also supply a wide range of finger prickers. Our favourite type of finger pricker is the Unistik 3 range as they are simple to use, are not painful to administer, and come in four different types:
- Unistik 3 Gentle — 30 Gauge Needle, 1.5mm long. Suitable for paediatric and frequent testing.
- Unistik 3 Comfort — 28 Gauge Needle, 1.8mm long. Suitable for low flow blood glucose testing.
- Unistik 3 Normal — 23 Gauge Needle, 1.8mm long. Suitable for medium flow blood glucose testing.
- Unistik 3 Extra — 28 Gauge Needle, 1.8mm long. Suitable for high flow blood glucose testing.
The Unistik 3 range of safety lancets feature Comfort Zone Technology, which has been shown to provide a more comfortable virtually pain-free injection in independent clinical trials. The range is colour coded for easy recognition, and each lancet is pre-set and ready for use — just twist off the protective sterile cap and take the sample.
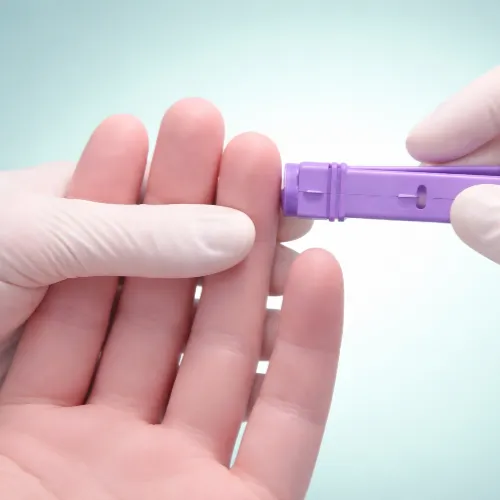
The Unistik 3 finger pricker is extremely easy to use — simply take off the protective cap by twisting, position the lancet against the targeted spot, and press the release button. It is the most advanced, disposable safety lancet on the market and is widely used for blood glucose self-monitoring, as well as a range of home health tests.
Which Unistik 3 Is Right for You?
Choosing the correct depth and gauge matters — too shallow and you may not get enough blood; too deep and you’ll experience unnecessary discomfort. Here’s a simple guide:
Quick Selection Guide
- Children or frequent testing: Unistik 3 Gentle (finest gauge, shallowest depth)
- Light skin or low blood flow: Unistik 3 Comfort (good for most one-off home tests)
- Regular blood glucose monitoring: Unistik 3 Normal (medium flow, most popular for diabetics)
- Thicker skin, callused fingers, or high blood volume needed: Unistik 3 Extra
If you are unsure which to choose, the Unistik 3 Comfort is a safe starting point for most adults using a home health test kit for the first time. The NICE guidelines on diabetes also recommend that people self-monitoring blood glucose use the finest gauge lancet that produces an adequate sample, to minimise discomfort.
Buy the Unistik 3 Comfort Lancet — the ideal finger pricker for home health testing. Pre-set, sterile, and virtually pain-free.
What Customers Say
★★★★★ Eric J – October 2015
“I use these finger lancets for checking blood sugar. What has amazed me with these safety lancets is the lack of pain when using them. I can be a bit of a wimp at times, but even I was surprised about how painlessly these things work. I’ve tried the Comfort Lancet mostly and that has been great.”
★★★★★ Derek G – February 2020
“These finger pricking lancets are perfect for me. The ones I first used were very painful to use. These are better, not only comfortable to use but they easily draw out enough blood for testing. A good purchase.”
★★★★★ Sarah W – January 2021
“These lancets are wonderful. I had struggled to get a decent blood sample with another brand which was quite painful to use. These I could barely feel and did a much better job of piercing the skin. Highly recommended.”
How to Use a Finger Pricker
Using a safety lancet correctly makes a real difference to both comfort and the quality of the blood sample you obtain. Follow these steps for best results:
- Wash your hands with warm water and soap, then dry thoroughly. Warmth helps blood flow to the fingertips.
- Choose your finger. Use the side of the fingertip rather than the pad — there are more capillaries there and it tends to be less sensitive.
- Prepare the lancet. Twist off the protective sterile cap from the Unistik 3. Do not touch the tip.
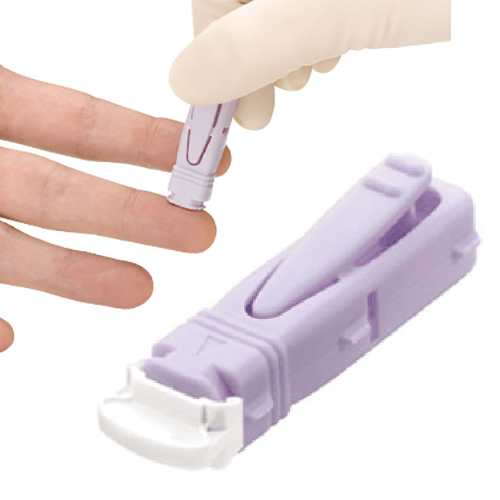
- Position and press. Place the lancet firmly against the side of your fingertip and press the release button. The spring mechanism does the rest.
- Obtain your sample. Gently squeeze from the base of the finger towards the tip to encourage blood flow. Avoid squeezing too hard (see note on sample quality below).
- Apply to the test. Follow your test kit’s instructions for applying the blood sample to the test strip or cassette.
- Dispose safely. Used lancets should be placed in a sharps disposal container — never in general household waste. Your local pharmacy can advise on sharps collection.
Understanding Blood Sample Quality
Let’s face it – nobody enjoys pricking their finger. But here’s something many people don’t realise: the quality of your blood sample matters just as much as the technique. A poor sample might give you inaccurate results, forcing you to prick yourself again. Think of it like making coffee – you wouldn’t use twice-brewed grounds, would you? The key is getting enough blood the first time around.
If you’re squeezing your finger too hard to get blood out, you’re actually diluting your sample with tissue fluid. That’s why choosing the right lancet depth and finger preparation techniques is crucial.
15 Tips to Reduce Finger Prick Pain
If you find finger pricking uncomfortable, these tried-and-tested tips can help significantly:
1. Test on the Side of Your Finger — There’s better blood flow on the sides of your finger so you should aim to test there rather than on the pad of your finger.
2. Warm Up Your Hands — Get the blood flow in your fingers going by briefly rubbing them together. This should make the finger prick a little less painful.
3. Choose The Correct Lancet — The Unistik 3 range comes in four types, ranging from gentle to extra lancing, this will allow you to choose the best lancing device for your needs.
4. Don’t Use the Alcohol Wipe — Alcohol is an astringent. This can make your skin tighter when you wipe it, making a blood sample harder to obtain.
5. Swap Fingers — If you are testing often, switch fingers to cut down the chances of skin scarring and calluses.
6. Use a Sharper Lancet — A finger prick with a sharper lancet will be cleaner and quicker, minimising discomfort. To keep your lancet sharp, replace it frequently.
7. Change the Depth Option — Most lancing tools offer a depth option that may be changed. Start with a lesser depth setting and progressively raise it until you hit the sweet spot between not too much discomfort and enough blood for testing.
8. Release Pressure — After you’ve pricked your finger, gently push on the surrounding region to assist ease any discomfort that may still be there. Additionally, this may aid in reducing excessive bleeding.
9. Find Distractions — While your finger is being pinched, distract yourself by doing anything that takes your mind off the pain. Listen to music, watch a film, or have a discussion.
10. Practise Deep Breathing — Before and during the finger prick, take a few slow, deep breaths to calm your body and lessen pain. Take a few deep breaths through your nose, hold them for a moment, and then gently let them out through your lips.
11. Apply a Warm Compress — A few minutes before testing, apply a warm compress or a warm cloth to your finger. The blood vessels are widened by the warmth, lessening the discomfort of the finger poke.
12. Apply a Numbing Cream — Take into account utilising a numbing gel or cream made especially for finger pricks. These topical anaesthetics can numb the region momentarily, lessening the discomfort brought on by the finger prick.
13. Keep Blood Sugar Levels Proper — High blood sugar levels might make your fingertips more sensitive, making a finger prick more painful. You may lessen the discomfort from a finger prick by successfully controlling your blood sugar levels.
14. Rotate Testing Locations — Testing on the same finger over time might enhance sensitivity and cause calluses. To lessen discomfort and avoid skin injury, rotate testing locations often while using various fingers.
15. Seek Professional Advice — If, despite using these suggestions, you still suffer significant discomfort during finger pricks, speak with your healthcare professional. They might be able to propose different methods or other tools that might assist lessen the discomfort brought on by finger pricks.
About the Author
Anthony Cunningham – Health Writer & Editor
Anthony Cunningham, BA (Hons), MA, is a UK-based health writer and editor with over 20 years’ experience running Zoom Health, a trusted source for home health tests, preventive care, and wellness guidance. He creates clear, evidence-based articles using NHS, NICE, and WHO guidance. Where possible, content is reviewed by practising clinicians to enhance accuracy and reliability, helping readers make informed healthcare decisions.
You May Also Like
Explore more articles on home health testing: